Thursday, March 15, 2012

St.Patty's Day Bow


Ohh This bow is too cute and simple. St. Patty’s Day is one of my favorite holidays or celebration. We get all dressed up in green and the family and I hit the parade. The past couple years we have been very lucky to have nice enough weather to BBQ in the back yard, hang out with family and friends. It is like an opening day ceremony for Spring J


I am not sure how many times I have plans to make my daughters shirt, pants or anything to stand out in the crowd of other overly green fans.


So this year I promised to make a cute but not “babyish” bow. She is 6 and thinks the Boutique bows are only for babies. Girls!haha.


Let’s get started!


You will need 1/4” or 3/8” grosgrain ribbon

You can use 1 or 2 colors

Hot glue

Barrette, alligator clip

Embellishment (Optional)

Scissors (Not Pictures OOPS)


I choose green and gold for my colors.
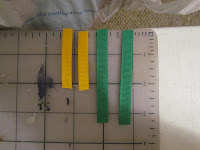
Craft Board, Not so pretty :)
1.      Cut 6 – 3” strips for the outside clover

            And 6 – 2” strips for the inside clover


2.      Take 2 – 3” strips and put a small drop of hot glue on top, then lay the second strip right on top.


3.      For the bottom I shaped the 2 ribbons to look like a heart the put a small drop of hot glue on the other and placed the ribbon at an angle.


This is so one end of the clover lays flat


Repeat with the remaining 4 strips AND the 2” strips


(Took me about 5 minutes)


Easy so far!?!


Should Look Like This


4.      Now put a dap of glue on the flat corner of the 3” clover and lay the 2” on top to attach.


I choose to put the smaller clover in front, you can do either way.

Clean up the glue strings


5.      Here comes the tricky part, but once you get it, it will be easy J

 Put an extra small dap of glue in the corners of the flat area, THEN Take the top of the 2” strips, bring it down and hold. This will give the ribbon a HEART Shape.


 Can you see the glue?


6.      Again you are going to put an extra small drop of hot glue in the center top of the 2” heart.

 Grap the center point of the 3” and slide it all the way down and into the 2” heart.

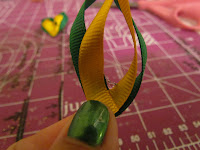
Just a note: I put the drop of glue on the back side and slide the green ribbon down the center of the yellow heart until it couldn't go any further.


7.      Clean up any hot glue strings flying around and you have one part of your clover!
      8.      Do this 2 more times
      9.      Now look at your pieces and see which order you want them to lay.

A small dot of glue on the flat areas of the clovers and attached.


 10.  Cover your clip, attach clover to clip and add embellishment !!!


Looking there your own Boutique Clover!


                                         Don’t forget to post pictures on my facebook page!


Monday, March 12, 2012

Link to facebook page!

http://www.facebook.com/pages/Mia-Mingles-Boutique/118252501597811

Spirit Fingers!

I find that when I think of an idea I am never quick enough to introduce the product. I am trying to step up and I have notice some cute Spirit Fingers. I thought immediately my daughter would love them but not for $25.00 - $30.00. Crazy! So I have finally made a pair! I was suppose to make a pair about 4 weeks ago but things happen.
With Spring around the corner this is still a great way to show spirit. Great for baseball games that get chilly, 5k or 10k runs that needs some spirit like Susan G. Komen and Jingle Bells Arthritis walk. great for indoor basketball or hockey games and lets not forget parades! Especially with St. Patty's day only 5 days away.
Great for the whole family and only $12.00. Email me your colors and I'll get them out in no time!

Please check out my other items on facebook!

I can take payment right away with paypal.


Sunday, March 4, 2012

Mia Mingles Boutique: Upcycle T-shirt Knit Bracelet

Mia Mingles Boutique: Upcycle T-shirt Knit Bracelet

Upcycle T-shirt Knit Bracelet


I have been gun ho over pinterest.com and I ran across V and Co. knit bracelet. This chain is made with knit fabric, scissors and your fingers. WOW! So simple. I had to try it. I didn't go out and buy knit but grabbed some old t-shirts. The tutorial used new fabric but this is great way to upcycle! And with St. Patrick's Day around the corner, this is a great way to get a spot of green.

 This is all you need!

Cut the hem off the shirt and cut 1inch strips.
The number of strips with vary depending on the size you choose.


                Sorry blurry, I cut off the side seam too.


Cut small slit on both ends of your strips.
This is to tie the strips together.


This is not my idea and the full tutorial can be found at:


But I made a 4 finger chain bracelet, 3 finger chain bracelet, and a 2 finger chain bracelet.


 Mia pop out so I had her quickly model for me.


Tips:

7 inch to 8 inch in length worked well. Depending on how you want it to hang on your wrist. Mia is wearing a 6 inch.

Knit stretches so as you are making the chain make sure to stretch the finish bracelet out as you are linking the fabric. This helped a tighter look which was a lot pretty then my first fluffy green knotted mess.


NOW If you want some pictures of how to create the chain let me know and Ill add to it.

I just wanna make sure to give credit to where credit is due :)


Finished product!

The bracelet on the left is a 2 finger chain. This was 6 inches long.
The bracelet on the right was the first attempt, 2 finger chain and 7 inches in length.

The first bracelet is 3 finger chain, 8 inches in length. It dangles a little bit.
The second bracelet had 1.5 inch strips and it is a four finger chain. This is 7 inches in length. TOO CUTE!!


Tuesday, June 14, 2011

Edible Excavator Cake

I think this was my first adventure in cake making. My son was turning one and we wanted to have a CAT party. Mostly for the truck theme. I did a lot of research and this is also when I came across Family Fun.  Again I have mentioned this is one of my favorite websites. Fun ideas for all ages. This cake was just for him and we probably did cupcakes or sheet cakes for everyone else.I wanted to share this fun recipe and if you continue to explore the cake section at www.familyfun.com you will discover a world of easy themed cakes for all events, seasons, ages and more.  Please post any pics of some fun ideas you have done!

You can find this specific cake at: http://familyfun.go.com/recipes/dessert-recipes/cakes-cupcakes/theme-cakes-general/edible-excavator-cake-688626/

Patriotic Bows

My Daughter loves to wear bows and as she got older and I got wiser, I thought hey let me save some money and make my own bows. The boutique bows are sweet but as she is well into her fives the boutique bows were not fitting her head or long hair. Last year she got involved in cheerleading and I fell in love with "Cheer" style bows. I offer basic boutique bows and flowers but my new love is Cheer style bows. I have been playing around and this patriotic bow is one of my favorites! I hope you like it as much as I do. This paticular bow is sold out! oops :) but I will be featuring a new one soon. Now I can do custom orders too. You have an outfit you want to match or colors you love to wear, just write me a not and I'll get some ideas out to you. This basic Cheer style bow is $5.00. I do not mind shipping with an additional shipping and handling fee